Virtualbox пинг виртуальной машины

Настройка сети VirtualBox

Виртуальные машины VirtualBox очень часто используются для тестирования различного программного обеспечения и его взаимодействия между собой. Обычно, таким программам необходим доступ к интернету. Время от времени возникает необходимость протестировать работу программ по сети или даже создать небольшую тестовую лабораторию из виртуальных машин.

В этой инструкции мы рассмотрим как выполняется настройка сети VirtualBox различными способами. Вы узнаете как объединить машины в одну локальную сеть, как дать им доступ к интернету и как связать их с основной системой. Но сначала поговорим о том, как может работать сеть.

Виды сетевых адаптеров VirtualBox

Существует несколько способов как настроить сеть в virtualbox, и каждый из них подходит для лучше для решения одной задачи и меньше для другой. Рассмотрим основные:

Теперь рассмотрим каждый вариант настройки более подробно.

Настройка сети Virtualbox

1. Настройка сети NAT

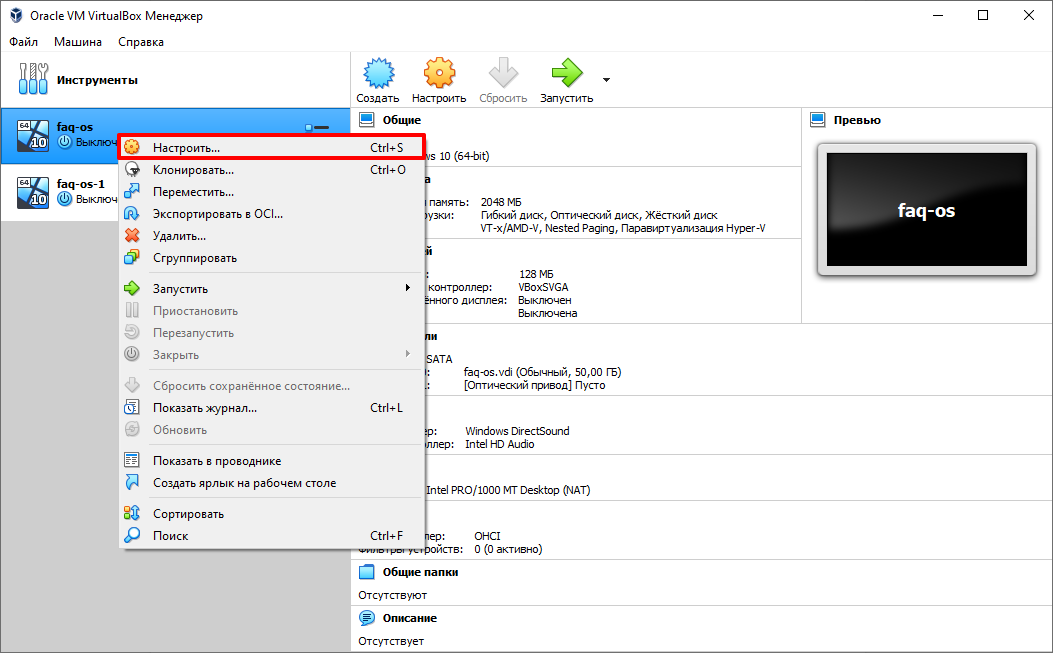
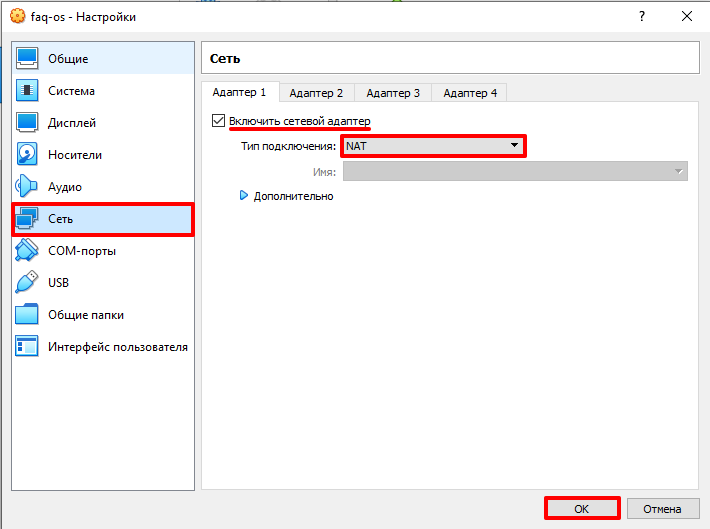
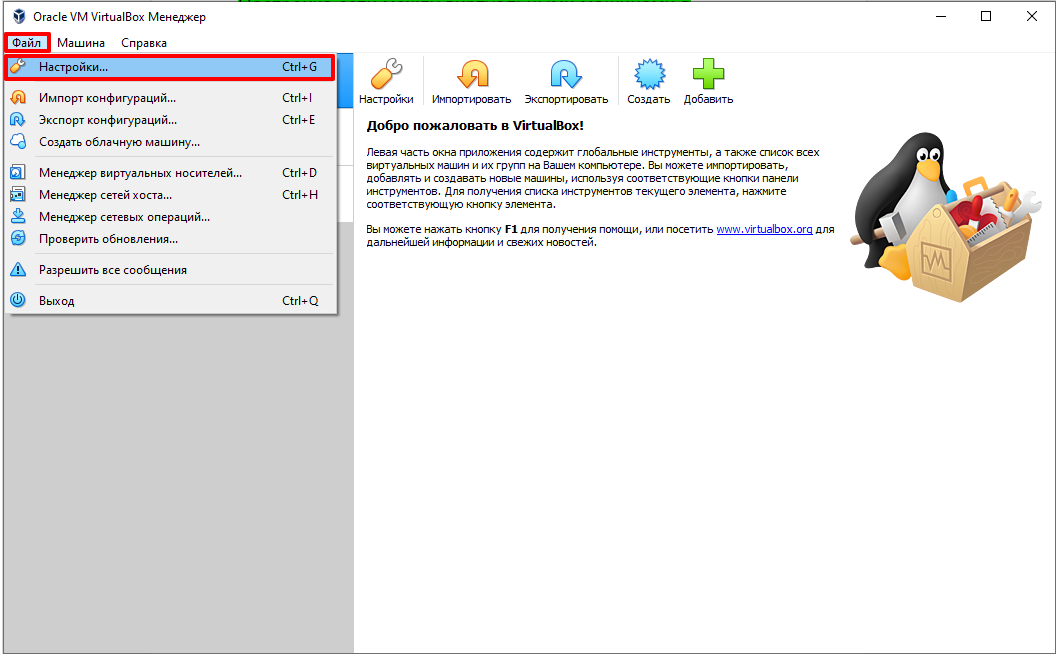
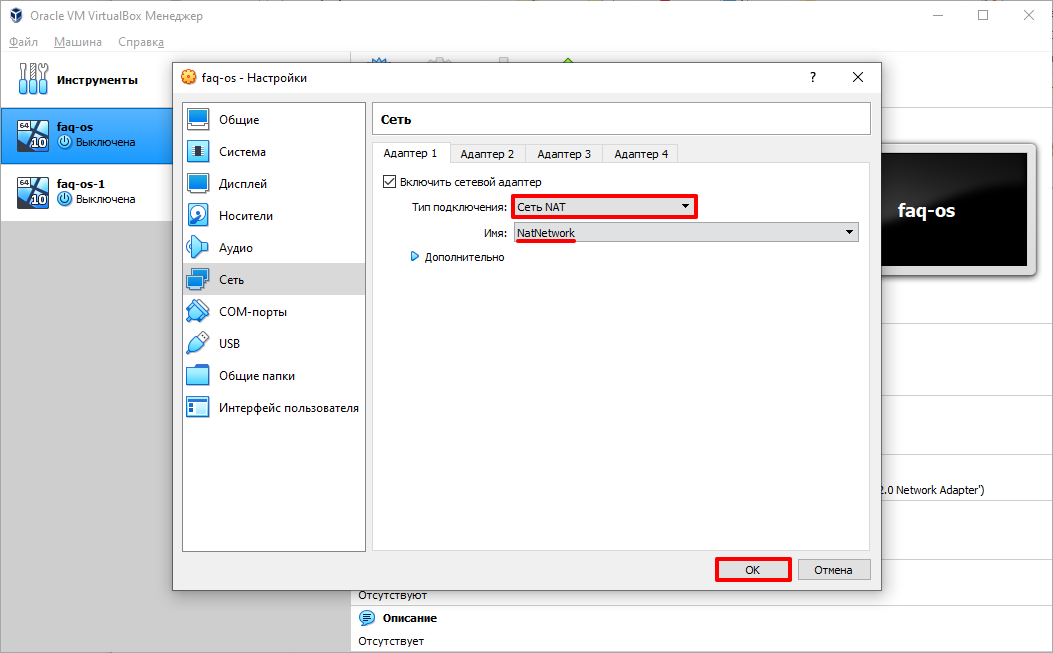
Здесь почти нет о чем говорить. Получение доступа к сети через NAT включено по умолчанию. Проброс портов я рассматривал в отдельной статье. Но если вы раньше отключали сетевые адаптеры, то чтобы включить NAT обратно достаточно открыть настройки нужной машины:

Virtualbox пинг виртуальной машины

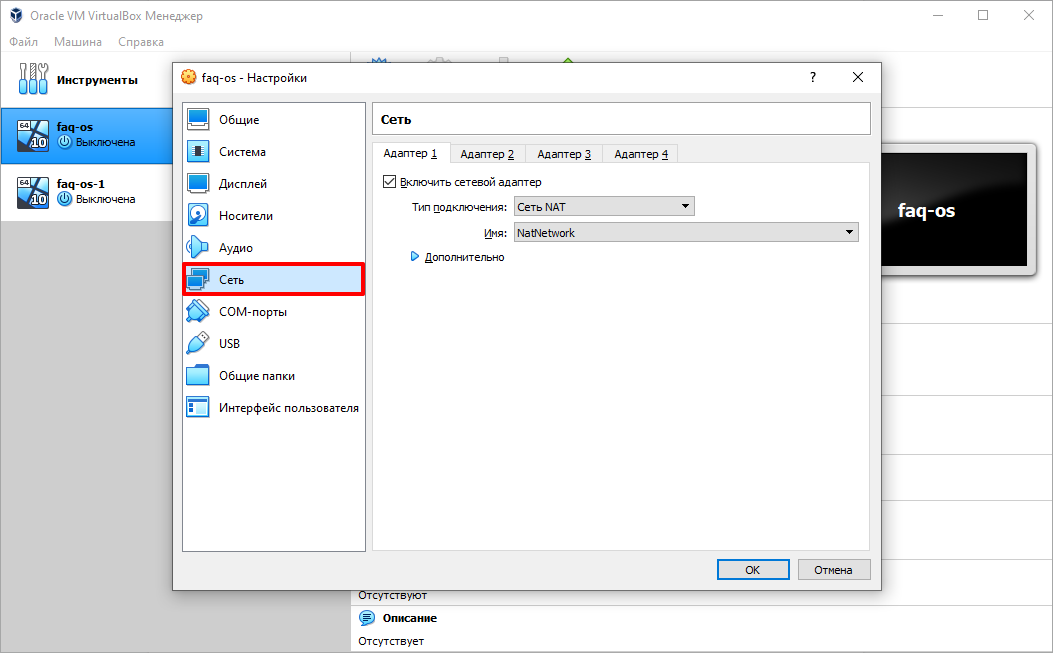
Перейти на вкладку «Сеть»:

Virtualbox пинг виртуальной машины

Выбрать один из адаптеров. К виртуальной машине можно подключить несколько адаптеров и это очень удобно, так как вы можете комбинировать вместе адаптер виртуального хоста и NAT чтобы получить преимущества обоих режимов. Дальше вам нужно выбрать пункт «NAT» в списке «Тип подключения».

На вкладке «Дополнительно» вы можете настроить марку устройства адаптера и MAC адрес:

Virtualbox пинг виртуальной машины

Если вы собираетесь устанавливать туда в Windows, то лучше будет работать Intel PRO/1000 MT Desktop, а для Linux можно оставить AMD PCNet FAST III, так как он поддерживается всеми операционными системами.

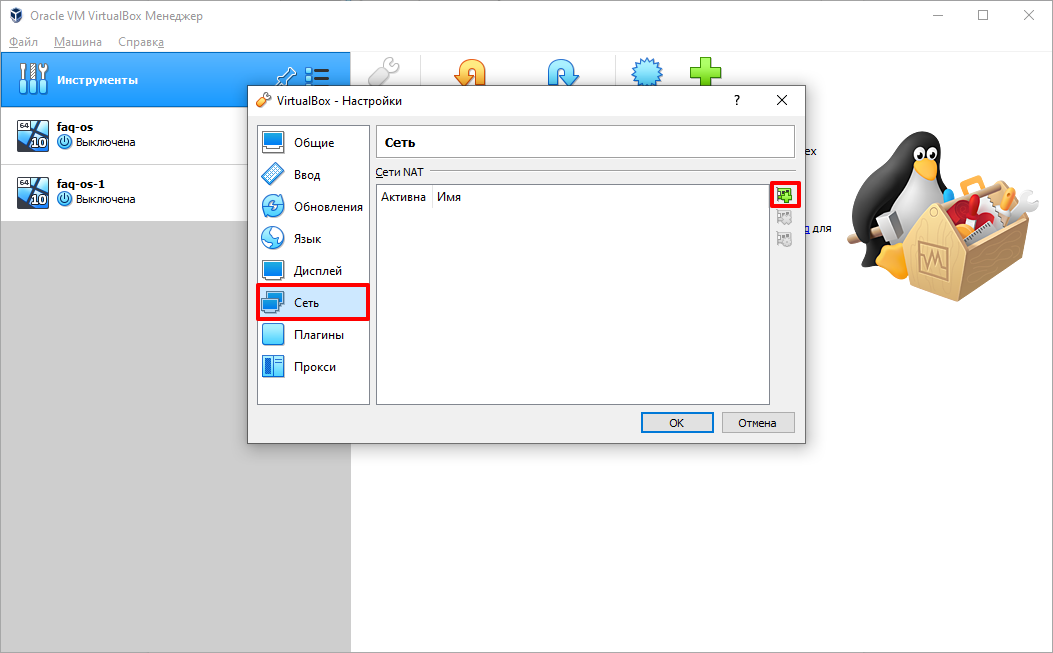
2. Настройка сети NAT

Virtualbox пинг виртуальной машины

Virtualbox пинг виртуальной машины

Virtualbox пинг виртуальной машины

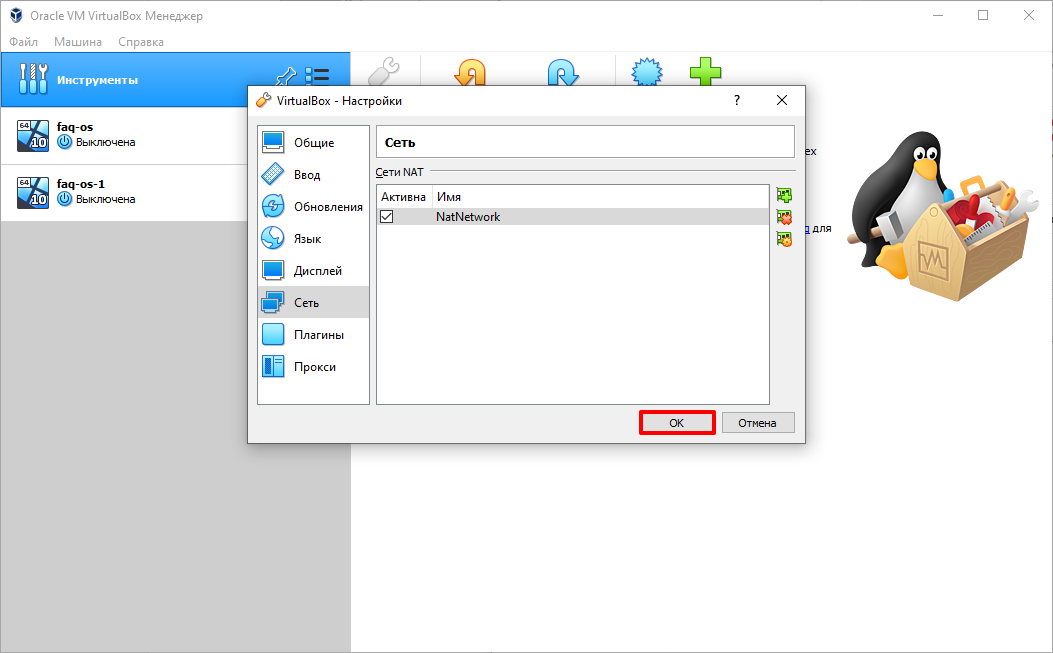
Теперь все машины, подключенные к этой сети, будут доступны друг другу, как в VMWare.

3. Настройка адаптера виртуального хоста

Virtualbox пинг виртуальной машины

Virtualbox пинг виртуальной машины

Нажмите кнопку «Создать», затем, в появившемся адаптере, напротив пункта DHCP установите галочку «Включен».

Теперь вернитесь к списку виртуальных машин, зайдите в настройки машины, «Сеть»:

Virtualbox пинг виртуальной машины

Virtualbox пинг виртуальной машины

Для всех машин, которые вы хотите объединить в одну сеть нужно выбирать один и тот же адаптер хоста. Если вы захотите добавить машинам также доступ в интернет, просто перейдите на вкладку «Адаптер 2», включите его и настройте NAT, как описано в первом пункте.

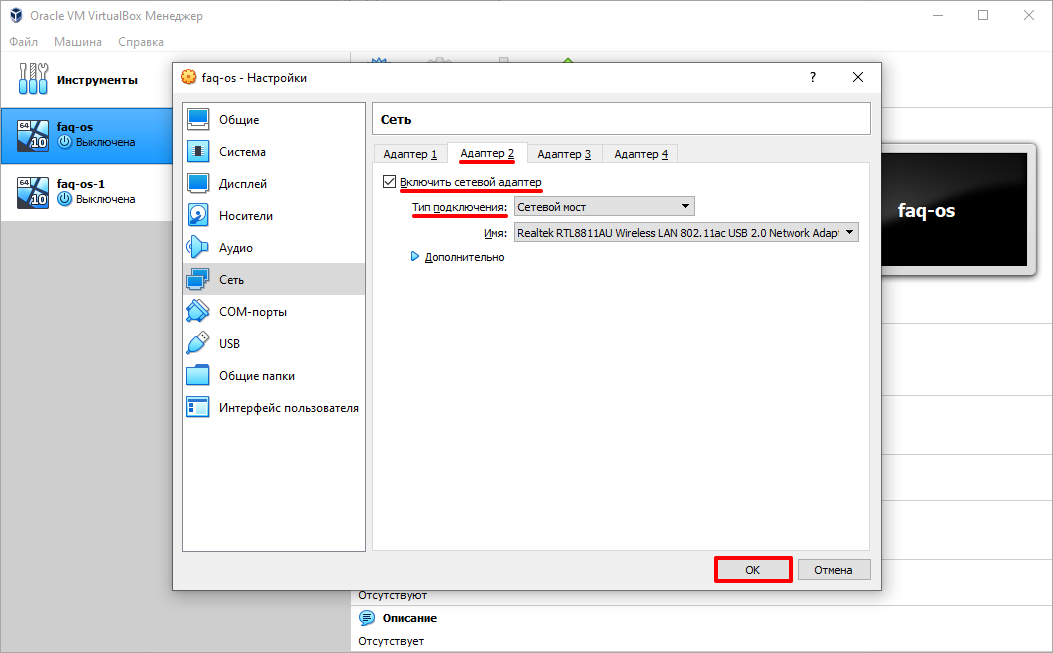
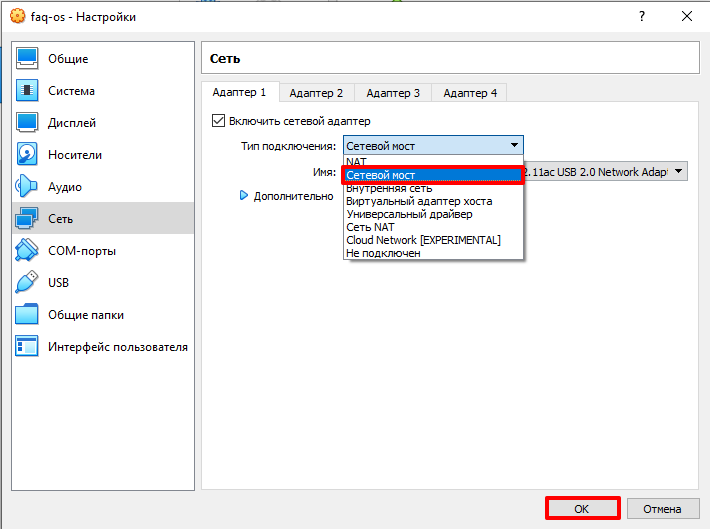
4. Настройка сетевого моста VirtualBox

Virtualbox пинг виртуальной машины

В поле «Имя» вам необходимо выбрать сетевой интерфейс, который будет использоваться для связи с внешним миром. Минус такого способа в том, что внешние компьютеры смогут получить доступ к виртуальной машине, а это не очень хорошо с точки зрения безопасности.

5. Внутренняя сеть VirtualBox

Virtualbox пинг виртуальной машины

Выводы

Virtualbox пинг виртуальной машины

В этой небольшой статье мы рассмотрели как выполняется настройка сети VirtualBox, как видите, это не так уж сложно, как может показаться на первый взгляд, несмотря на операционную систему, которую вы используете. В большинстве случаев достаточно сети NAT, но иногда может понадобиться виртуальный адаптер хоста, все же остальные режимы используются намного реже.

Источник

Не могу пинг гостевой ОС в VirtualBox, но можно пинговать хост

Я хочу подключиться к обеим гостевым ОС. Я попытался пропинговать обоих гостей, но это не работает.
Как можно пинг в Windows хоть 7 узлов.

7 ответов

Я был удивлен найти ответ, который, наконец, работал для меня в форуме ubuntu:

в зависимости от версии Windows, которую вы использовали в вашем VirtualBox, для того, чтобы иметь возможность получить ответ на ваши пинги вы, вероятно, необходимо создать по крайней мере одну папку на машине Windows. Например, в Windows XP после настройки хотя бы одной общей папки устройство будет отвечать на запросы ping. А если нет акции, не пингует будут возвращены.

Так что в основном то, что я сделал было:

EDIT: чтобы уточнить, моя настройка-Windows7 Host & Windows7 Guest.

вот надеюсь, это кому-то поможет.

Если вы хотите, чтобы ваша виртуальная машина была доступна в сети, как автономная машина (я думаю, это то, что вы пытаетесь сделать), проверьте следующее

в VirtualBox GUI interface, в разделе сетевые настройки каждой виртуальной машины, выберите режим моста, а не NAT.

в каждой виртуальной машине настройте статический IP-адрес или dhcp.

для брандмауэра блокировки вопрос, проверить мой ответ на другой вопрос здесь

на хостинге, в проводнике, перейдите в

Панель управления\все элементы панели управления\Брандмауэр Windows\разрешенные приложения

вышеуказанный путь для windows 8, другая версия windows может отличаться слегка.

протестировано на двух гостевых коробках Ubuntu 16.06

auto enp0s8 iface enp0s8 inet dhcp

после этого изменения вы перезагрузите машину, и теперь при запуске «ifconfig» должен получить IP-адрес адаптера только для хоста, который вы можете использовать для подключения с вашей хост-машины.

обе гостевые ОС имеют разные IP-адреса. Я могу пинговать хост от обоих гостей, гостя к гостю и гостей к хосту.

Источник

Can’t ping VirtualBox? Troubleshooting Guide and Solution

If you have just installed a guest OS like a Linux distro, Windows 10 or macOS on VirtualBox and you are hosting some network service on that virtual machine, then you need to configure some settings on the virtual box so that you can ping to that virtual machine and communicate with it over the network from any machine on your local network.

This article shows you the configuration changes you need to make on your virtual box in order to make it possible. I have written this article keeping complete beginners in mind, so instead of just answering the question “what to do to make it work?” I have also answered the questions “why it doesn’t work?” and “what is the reason behind the default settings?

If you are an advanced user, or if you are just interested in the solution then feel free to just skip to section 5 “The short version of the answer” section using the table of contents below.

VirtualBox Basics

This section gets you introduced to the various terminology used in the rest of the article.

What is VirtualBox? VirtualBox is a hypervisor application that lets us host operating systems in a virtualized environment. In simpler words, its basically an app that runs on one operating system (The Host Operating System) and lets us boot other operating systems (Guest OS) as an app within the Host OS.

The Host OS can be Windows or Linux or Mac OS, and the guest can also be one of these. So if you have a Macbook and you wish to run some windows applications on it, which are not available for macOS, then you can run it by installing Windows inside VirtualBox.

Configuring VirtualBox

What are the configuration options available in a VirtualBox to share resources between Host and Guest OSes?

VirtualBox lets us allocate resources for the Guest OS. These resources include the following

You can get to these options by clicking on the settings icon as shown in the image below.

Virtualbox пинг виртуальной машины

Let’s assume your computer running the Host OS is a Windows 10 laptop that has a quadcore processor, 16GB of RAM and 1TB of hard disk space. If you wish to run Linux on it, you can tell the virtual box app to allocate it one of the CPU cores, 4GB of RAM and 25GB of hard disk space so that you can run both these operating systems smoothly and simultaneously.

If you wish to run more than one Guest OS, then that is also possible, you just need to have enough resources and allocate them to each of the Guest OS appropriately so that there are enough resources left for the Host OS, Windows 10 in our example, to run smoothly.

Other than CPU, RAM, and hard disk space, you can also allocate networking resources and USB devices to the guest OS.

Mouse and Keyboard will automatically be transferred to the guest OS as soon as you give focus to the virtual machine by clicking on it.

Assume you have another USB device that you need to use from the guest OS. Then using the configuration options, you can specify it in the settings so that the special USB device also transferred to the guest OS once you boot it up.

Now that we have seen the basic configuration options of VirtualBox, lets next look at the network configuration options, which is the main focus of this article.

Network Configuration Options in VirtualBox

You can get to the network configuration options by clicking on the Network tab as shown in the picture below.

Virtualbox пинг виртуальной машины

These are the default settings that VirtualBox provides you with once you install any Guest OS on it. As you can see the “Attached to” field is set as NAT.

Meanings of these Network Options

The table below shows the various available options for the Attached to field shown in the screenshot above and their meanings

VM HostVM1 VM2VM->InternetVM

As you can see in the table above, for NAT option, there is no connection to the host (row 4, column 1). To understand why that is the case let’s see what NAT is, what is the need for NAT, how it works and what is the reason its chosen as default by the developers of VirtualBox.

NAT Basics

What is NAT? NAT stands for Network Address Translation. This is a protocol that is used on routers to translate between 2 sets of IP addresses namely public and private IP addresses. It does that using the concept of Port forwarding.

Need for NAT

As we know an IP version-4 address (ipv4) is 32 bits long. This means we can have up to 2^32 combinations, which comes to about 4,294,967,296 or 4 billion unique addresses. But since we are living in the internet age and each one of us has about 5 devices per person (office laptop, home laptop, mobile phones, smart TVs, desktops, tablets, etc) connected to the internet. Hence we need more than 4 billion addresses which is possible through ipv4. To overcome this issue, the engineers came up with ipv6 addresses, which are 64-bit address, so we can have around 18,446,744,073,709,551,616 devices. This number is more than the number of grains of sand in all the beaches all over the world so we should be good with ipv6 for the foreseeable future!

But like all technologies, adapting to ipv6 addresses is gonna take some time. This is where NAT comes in. If you go ahead and type in google what is my IP? You will see a result that is different than the one shown if you type in ifconfig command (if you are on Mac or Linux) or ipconfig (on windows) on the terminal.

In fact, if you go to any device on your Local Area Network (LAN) and google what is my IP? you will get the same IP address for all of the devices. This is the IP address of the router device provided by your Internet Service Provider (ISP) and not your computer.

This is because in our networks we use 2 sets of IP address namely private IP address and public IP address. The router translates between the private and public IP addresses using the NAT protocol so that it can send the results of your google search to your computer and not to your colleague’s computer!

The image below shows the hierarchy of IP addresses and the use of NAT

Virtualbox пинг виртуальной машины

How NAT works?

To explain how it works briefly, the router keeps track of which computer requested what resource with the help of something called address translation tables so that when a network packet is received from the internet it can send the received packets to the correct computer on your local area network.

I hope you understood the need for NAT and how it conceptually works. The exact mechanisms of NAT and its various types are beyond the scope of this article, so let’s stop here. I recommend you to do more research on it if you are interested.

The problem

Keeping the default settings, I have booted up my ubuntu virtual machine and I got its IP using the ifconfig command as shown in the screenshot below.

Virtualbox пинг виртуальной машины

In Linux, the inet addr is the IP address.

When I try to ping to this IP from my host OS (windows10), I get the following results.

Virtualbox пинг виртуальной машины

As we can see from the screenshot above, my host windows machine cannot see the virtual machine on my network.

Let’s try pinging the other way. I got the IP of my windows machine using the ipconfig command as shown in the screenshot below.

Virtualbox пинг виртуальной машины

Then I tried pinging this IP from the guest OS and you can see the screenshot below.

Virtualbox пинг виртуальной машины

As you can see in the screenshot below, pinging from the guest OS to the Host OS is a success.

This is because VirtualBox uses the NAT protocol to translate between your Host OS’s IP and the Guest OS’s IP.

Reason only one side pinging works

Part of this NAT protocol is that NAT will only allow network traffic originated from the inner side of the NAT.

For example, when you open up your browser and go to google.com, you are sending a request to the google server from the inner side of the NAT (LAN side) and the router sends this request forward to the Google server which is in the outer side of the NAT (the internet) and once the server sends the requested page back, your router sends it back to your computer.

The diagram below shows the hierarchy of NATs in a typical network with devices being the physical computers and vm’s being the virtual machines running inside physical computers.

Virtualbox пинг виртуальной машины

Reason NAT is chosen as default

In a typical organization, you can see several computers running multiple vm’s on each computer. They also usually have a strict networking policy to allow only authenticated devices to have access to the LAN for security reasons. If developers need to talk to network administrators every time they wish to make a virtual machine, then this process will get tedious for everyone.

Thus by using NAT, you can have as many virtual machines running as you desire and you are not using up any of the IPs in your LAN. In other words, VirtualBox attempts to create a sub-network under your local IP using NAT so that

Need#2 for NAT

This brings us to the Need#2 of NATs, which is that nobody from outside your LAN can initiate a session with your computer and nobody from the internet can hack your computer.

Now let’s extend the analogy of the internet & LAN to your host & guest OSes. In the same way, you can initiate a session from your LAN to the internet but not the other way around, your guest OS can talk to machines on the outside of the NAT, in our case the Host OS, but not the other way around. I hope you got the point.

The Solution

But what if you need to set up a network app like a web server or a file server inside the virtual box so that your colleagues can access it from their machines? Or maybe you need to log into your virtual machine remotely over SSH?

Then you need the virtual machine to act as a separate computer on the LAN as shown in the image below.

Virtualbox пинг виртуальной машины

To achieve that, you need to change the option from NAT to Bridged Adapter as shown in the screenshot below.

Virtualbox пинг виртуальной машины

After changing the settings again, I have booted up my ubuntu virtual machine and I got its IP using the ifconfig command as shown in the screenshot below.

Virtualbox пинг виртуальной машины

Now to test if it works, go to the command line again and try pinging the IP to see if it works. When I try to ping to this IP from my host OS (windows10), I get the following results.

Virtualbox пинг виртуальной машины

So now I can ping to my guest OS from my host OS.

The short version of the answer

To summarize the solution you need to follow these steps to be able to ping your virtual machine from any other device on your network

Step#1: Choose your virtual machine and click on settings

Virtualbox пинг виртуальной машины

Step#2: Go to network settings

Virtualbox пинг виртуальной машины

Step#3: Choose Bridged adapter

Virtualbox пинг виртуальной машины

Step#4: Reboot the virtual machine

Step#5: Get the IP of the virtual machine and ping it to see if it works!

This is the easiest solution to just let the virtual machine be on the same level as other machines on your LAN. If you are doing this with your home network, it should work just fine. If you are doing it in your office be sure to check in with your network admin to make sure he opens up an IP for you if needed!

Did all the steps correctly and it still doesn’t work? then read on for some more settings you can change that might help make it work as you need it to.

Other settings that might help

1. Check your IP settings

Make sure they are in the same subnet and have the same DNS and gateway. If DHCP is enabled, then the virtual box should automatically get the correct IP settings(dns, gateway and ip addresses)

What is DHCP? DHCP stands for Dynamic Host Configuration Protocol. It’s a networking protocol that assigns IP settings to your device.

If it’s disabled on your guest OS, try enabling it and see if that solves the issues.

Since the process to change the DHCP settings on each OS varies a lot, I leave it to you to google and figure out how to change it.

2. Check your firewall

Configure firewall settings on the host OS to give all permissions to the virtual box app.

What is a firewall? It is a program that scans all the incoming network packers and only allows the ones as instructed by its settings.

I leave it to you to google and figure out how to do this for your specific Host OS.

3. Check your MAC address

MAC stands for Media Access Control, it is a unique address that is assigned to every hardware device capable of connecting to the internet.

Make sure that the MAC address as shown in the screenshot below is not a duplicate on your LAN. In other words, make sure that none of the other computers in your LAN has this MAC address.

Virtualbox пинг виртуальной машины

A couple more workarounds

Wordaround#1: Try enabling promiscuous mode

This mode basically skips the internal processing of received packets and sends all the incoming packets straight to the CPU.

This can be done by changing the settings of VirtualBox as below.

Virtualbox пинг виртуальной машины

But be careful as the promiscuous mode is set to deny for a good reason so that no one can hack into our machines. Make sure you don’t have sensitive data in your virtual box guest OS if you wish to turn it on.

You should be good to go as long as

Wordaround#2: Try sharing a folder

The host/guest OS combination that this workaround is found to work in is shown below

Guest OS: Windows XP or 7

Add at least 1 shared folder from guest to host

But this is not the best solution since its not practical as it can get tedious to share a folder to all the present and future devices that might need to connect to your virtual machine’s network-based service.

If you wish to connect to just one or 2 machines then its worth giving it a try.

There are other ways to get it to work. For example, if your goal is to just connect to your VirtualBox using SSH and not let all other machines on your LAN see your virtual machine, then you can always open port 22 on the NAT settings and connect to it from the particular machine of interest and keep it hidden to all other machines. You can learn more about how to accomplish that at this link.

Bonus Tip

One more tip before I conclude this article! Try enabling hardware virtualization on your Host PC’s BIOS if it supports it, as this will increase the performance of your VirtualBox. You can google how to do this, by searching “how to enable virtualization in ”

Alright, let’s stop here.

I hope you guys learned something through this post and hope it was useful to you guys.

You can email us or contact us through this link if you have any questions or suggestions.

If you liked the post, feel free to share this post with your friends and colleagues!

Источник

Настройка сети VirtualBox

VirtualBox позволяет на одном устройстве запустить несколько виртуальных машин с разными операционными системами. Виртуальные машины используют для тестирования нового ПО, для знакомства с особенностями разных ОС, а также для запуска программ, которые созданы для определённой операционной системы.

Какие типы подключения доступны в VirtualBox

В VirtualBox можно разными способами настроить интернет:

Для VirtualBox 6.1 доступны инструменты:

На одной виртуальной машине можно использовать до 4 сетевых адаптеров. Для каждого адаптера есть возможность выбрать любой тип подключения. Благодаря этому можно комбинировать настройки, выбирать разные варианты работы сети. Например, комбинировать NAT и сетевой мост. Ниже мы рассмотрим, как включить/отключить адаптер.

Как включить и отключить адаптер

1. Выберите гостевую ОС, кликните на неё правой кнопкой мыши. Нажмите Настроить:

Virtualbox пинг виртуальной машины

2. В появившемся меню выберите Сеть:

Virtualbox пинг виртуальной машины

3. Выберите адаптер, который хотите добавить или удалить. Затем переключите чек-бокс Включить сетевой адаптер в нужное положение. Если вы включаете новый адаптер, в выпадающем списке выберите тип подключения и нажмите OK:

Virtualbox пинг виртуальной машины

Готово, гостевая ОС будет работать с выбранными адаптерами.

Как подключить виртуальную машину к интернету

Если вам нужен доступ только в интернет, можно использовать NAT-подключение. NAT изолирует виртуальную машину от соединений извне, поэтому доступа к другим гостевым ОС при таком подключении не будет. Проводником в интернет выступает хост-система, через которую и проходят все входящие и исходящие запросы.

В VirtualBox при создании каждой виртуальной машины подключение к интернету с помощью NAT происходит автоматически. Поэтому это самый простой способ подключения гостевой ОС к интернету.

Чтобы включить или отключить интернет с помощью NAT в VirtualBox:

1. Выберите нужную виртуальную машину и кликните по ней правой кнопкой мыши. Нажмите Настроить:

Virtualbox пинг виртуальной машины

2. В появившемся меню выберите Сеть. Поставьте галочку напротив «Включить сетевой адаптер». Выберите тип подключения NAT и нажмите OK:

Virtualbox пинг виртуальной машины

Настройка сети на виртуальной машине VirtualBox

Готово, теперь вы знаете, как включить интернет на виртуальной машине VirtualBox.

Как настроить сеть между хостом и виртуальной машиной VirtualBox

Для подключения между основной и гостевой ОС нужно использовать тип подключения «Сетевой мост». В этом случае виртуальная машина подключается напрямую к основной сети как полноценное устройство. Для подключения используется сетевая карта хост-системы.

Чтобы включить сетевой мост:
1. Выберите виртуальную машину, которую хотите подключить к сети. Кликните по ней правой кнопкой мыши и нажмите Настроить:

Virtualbox пинг виртуальной машины

2. В появившемся меню выберите вкладку «Сеть».
3. В настройках адаптера в строке «Тип подключения» выберите Сетевой мост и нажмите OK:

Virtualbox пинг виртуальной машины

Готово, гостевая ОС теперь доступна для основной.

Настройка сети между виртуальными машинами в VirtualBox

Иногда нужно объединить в одну сеть несколько виртуальных машин. Для этого используется подключение «Сеть NAT». Она объединяет необходимые виртуальные машины в локальную сеть. Как и в случае с обычным NAT, у каждой есть доступ в интернет, но от доступа извне они изолированы.

Чтобы создать сеть из виртуальных машин VirtualBox:
1. На главной странице VirtualBox нажмите ФайлНастройки:

Virtualbox пинг виртуальной машины

2. Перейдите во вкладку Сеть и нажмите на кнопку с зеленым плюсом:

Virtualbox пинг виртуальной машины

3. Нажмите OK:

Virtualbox пинг виртуальной машины

4. Выберите виртуальную машину, которую хотите добавить в сеть, и кликните по ней правой кнопкой мыши. Нажмите Настроить:

Virtualbox пинг виртуальной машины

5. Выберите тип подключения Сеть NAT. В строке «Имя» выберите имя созданной сети. Нажмите OK:

Virtualbox пинг виртуальной машины

Как создать сеть из виртуальных машин VirtualBox

6. Если вы хотите подключить другие виртуальные машины к сети, повторите действия с 4 шага.

Готово, локальная сеть из виртуальных машин создана.

Источник

Добавить комментарий

Ваш адрес email не будет опубликован. Обязательные поля помечены *